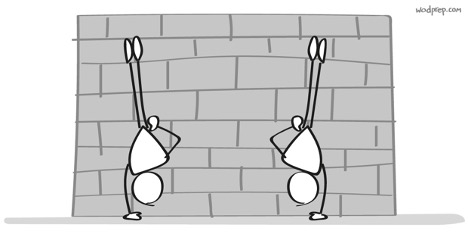
Step 1: Nose-to-wall holds
When you climb up (AKA a “wall walk”) try holding a handstand where only your nose and your toes are touching the wall. This will naturally keep you in a stronger hollow body position and will allow you to support weight in your stable shoulders, and not on the wall.
Tips:
- Focus on keeping a tight core.
- Keep your feet together and pointed.
- Nose should be touching the wall (forces you to keep head neutral).
Benchmark:
Try to accumulate 30 seconds+ unbroken holding this position. Remember to breathe! I like to program these handstand holds in my warm-ups on a regular basis.
Step 2: Shoulder Taps
When handstand walking, you never actually have two hands evenly planted on the ground. Instead, your weight is constantly shifting from one arm to the next as you move forward.
The shoulder tap drill allows you to practice this weight shifting in a controlled environment. You are learning how to shift weight from one arm to the next while also maintaining strong shoulders (and balance).
Tips:
- Start by shifting your weight and lifting one hand off the ground very slightly. No need to reach all the way to your shoulder immediately.
- As you get comfortable, lift your hands higher and higher. Try to transfer from one hand to the next smoothly, with no pauses.
Benchmark:
Work up to consistently stringing together 15-20 unbroken shoulder taps before moving on to the next handstand walking progression. I love to throw these into an EMOM.
Step 3: Hip Touches
This is pretty much the same thing as shoulder taps, except you are demonstrating an extreme level of control and precision. You are isolated on one hand for a much longer time which teaches you how to maintain body control while upside-down in a handstand position.
Tip: Focus on keeping your core tight! Otherwise it is very easy to lose the hollow position and fall to the floor.
Benchmark:
Once you can string together 10+ of these in a row, you will be ready to kick some serious handstand walking butt!
Step 4: Off-wall Handstands (Holds)
Now that you have established lateral (side to side) balance, it’s time to work on vertical balance (staying upright).
In this step, simply use your feet to kick away from the wall in order to hold a handstand. The best part is that the wall will give you a “safety net” for your feet to come back down. Practice holding for a few seconds at a time and slowly increase.
Sidenote: when you first try this, find a spotter to make sure you don’t fall forward. Otherwise this can get ugly and turn into some really awkward forward rolls.
Tip: Start with your hands slightly further away from the wall so that they can stay in place for the off-wall handstand hold.
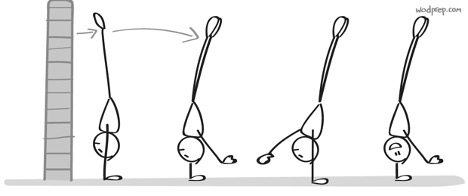 Step 5: Handstand Walk Aways
This is where it all comes together! Kick your feet off of the wall and allow yourself to be “pulled” forward by your body tipping past 90 degrees. Don’t over-reach your steps. Feel your balance slightly falling forward and then follow that by walking your hands forward to keep up.
Tips:
- Take short, choppy steps instead of long reaching steps. These short steps will help you keep your balance and move forward without falling!
- Keep your feet together and SQUEEZE your butt. This glute activation will help your body stay rigid while handstand walking. If you are loose, you’ll come crumbling to the ground.
Step 6: Try Handstand Walking!
After getting the hang of handstand walk-aways, you are ready to “go RX’d”! Get out there and try some handstand walks! Don’t be afraid to practice all of these progressions on a regular basis to keep your skills sharp.
I hope that you can apply this simple progression to your training. If you do, you will see major progress! Sooner or later you’ll be walking upside down through your house, gym, and local grocery store (yep, I’m guilty).
Leave A Comment